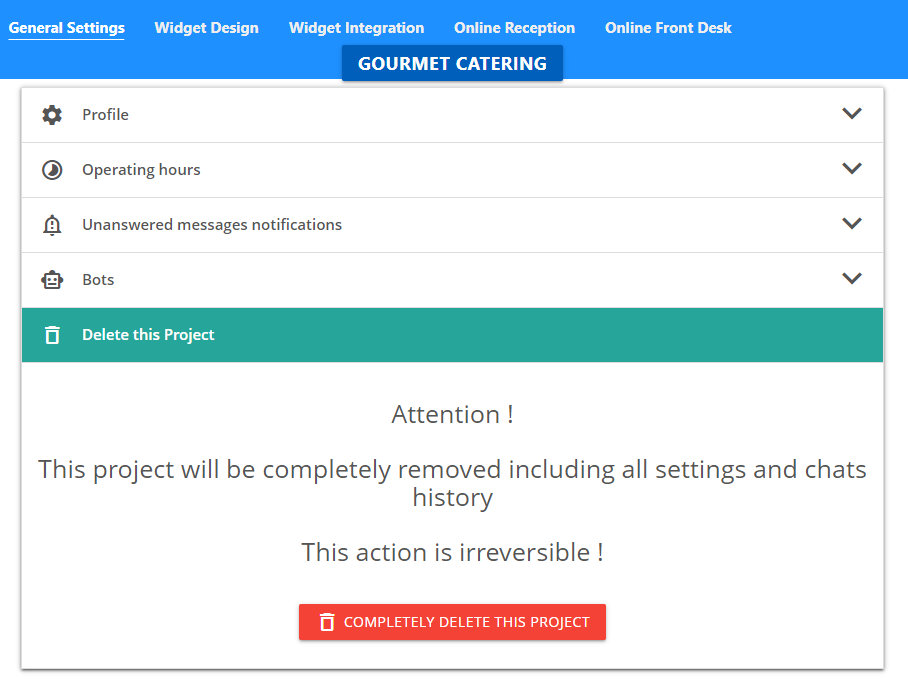
General Settings
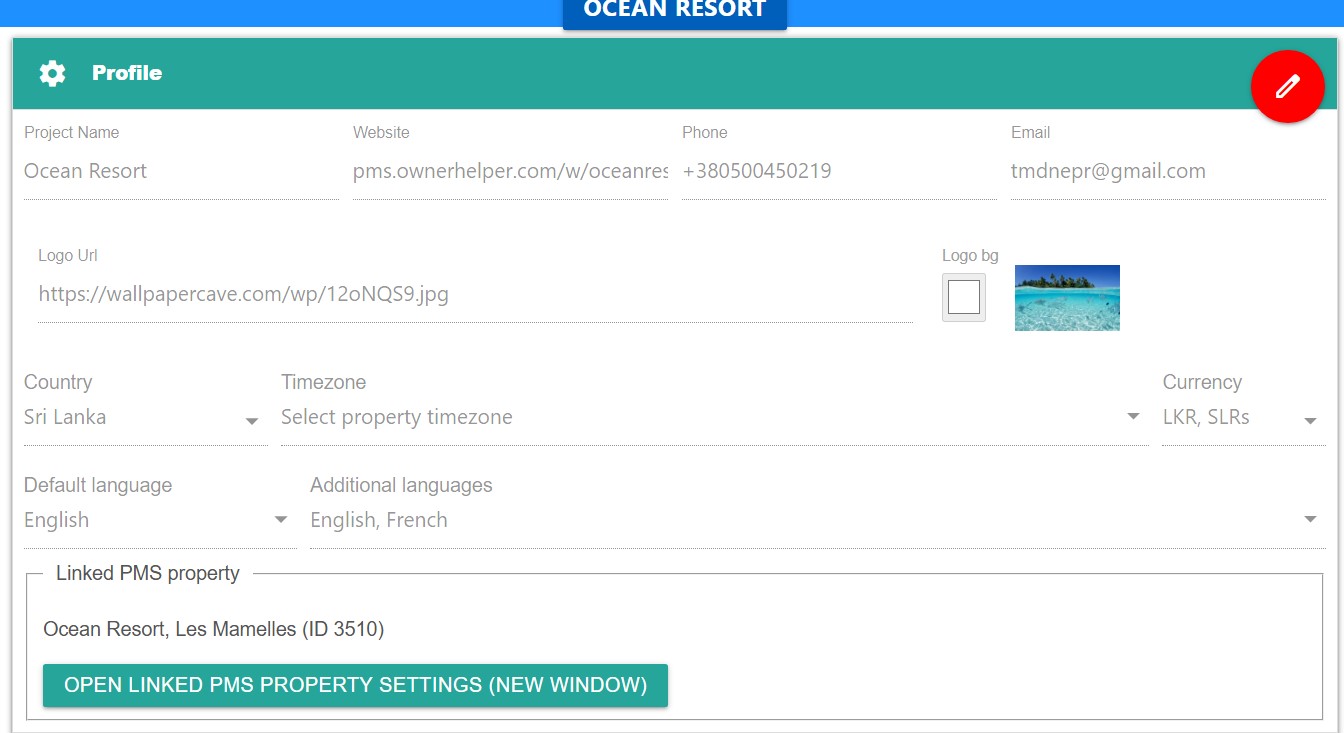
Profile
Key parameters of the Project
Make sure all fields are filled in correctly. This information is used in many modes including the Online Reception and is visible to your customers![]()
Make sure all fields are filled in correctly. This information is used in many modes including the Online Reception and is visible to your customers
Team
Settings for your project team members
You can add or remove members and assign their rights and privileges. Learn more![]()
You can add or remove members and assign their rights and privileges. Learn more

Delete Project
Complete and permanent deletion of an open project![]()
Team
Team Members (users)
List of all team members (users) who have access to the Project.
In the upper right corner is the button Add User allows to add a new member.
The Edit user button allows you to set the name and nickname of the team member.' + '
The Channels button allows to configure the Channels through which the team member will receive notifications of new messages.
The Delete user button allows to delete User from the Project![]()
In the upper right corner is the button Add User allows to add a new member.
The Edit user button allows you to set the name and nickname of the team member.' + '
The Channels button allows to configure the Channels through which the team member will receive notifications of new messages.
The Delete user button allows to delete User from the Project
User Channels
Our server notifies team members of new messages via push notifications and/or notifications to one of the messenger apps.` +
On this page, you can set up channels for receiving notifications and connect, if necessary, one of the standard messengers (Viber, Telegram, Facebook Messenger).
More details here![]()
Note for owners of iOS devices (iphone, ipad)
On this page, you can set up channels for receiving notifications and connect, if necessary, one of the standard messengers (Viber, Telegram, Facebook Messenger).
More details here

Note for owners of iOS devices (iphone, ipad)
On iOS devices, there is a limitation of receiving Push Notifications for PWA applications. This restriction must be lifted soon
To ensure the receipt of Push Notifications at the moment, we have implemented a gateway through Viber, Telegram and Facebook Messenger
You need to connect any messenger app convenient for you from this list in the settings. After that, Push Notifications to your device will begin to arrive in the connected application. When you click on the incoming notification, Team Messenger will be launched in the chat of the corresponding customer
PWA channel
PWA (Progressive Web Application) ensures fast and reliable operation of our service on any device with the ability to receive Push Notifications without the need to install additional applications. Takes up minimal space in memory.
There may be some restrictions depending on the device type. For uninterrupted notifications, make sure the service is properly configured
There may be some restrictions depending on the device type. For uninterrupted notifications, make sure the service is properly configured
- Android devices: Push Notification always come regardless of whether the device is turned on or off and whether PWA launched or our website is open in a browser.
After installing PWA on your Android device, make sure that notifications are allowed in the PWA system settings. - Windows devices: Push Notification only come when a web browser is running, but regardless of whether PVA is launched or our site is open in a browser.
Make sure that notifications are allowed for our site and/or installed PWA
If only Windows device is used to receive Push Notifications, it is recommended to additionally connect the channel through any of the messengers (Viber, Telegram, Facebook Messenger).
Install the corresponding messenger application on the same Windows device. In this case, notifications will come through the messenger and will not be lost if the browser is not running.
When you click on the received notification in the messenger, our PWA will be launched and the corresponding chat is open in Team Messenger - iOS devices: there is a limitation of receiving Push Notifications for PWA applications. This restriction must be lifted soon
To ensure the receipt of Push Notifications at the moment, we have implemented a gateway through Viber, Telegram and Facebook Messenger
You need to connect any messenger app convenient for you from this list in the settings. After that, Push Notifications to your device will begin to arrive in the connected application. When you click on the incoming notification, Team Messenger will be launched in the chat of the corresponding customer
Viber channel
Push Notifications will be sent to your Viber client app
Telegram channel
Push Notifications will be sent to your Telegram client app
Facebook Messenger channel
Push Notifications will be sent to your Facebook Messenger client app
Website Widget Integration
Embedding Widget to Website
- Open Project Settings.
- Go to Website Widget
- For each page of your website where you want to place the widget
- Set up Widget initial state and Tags
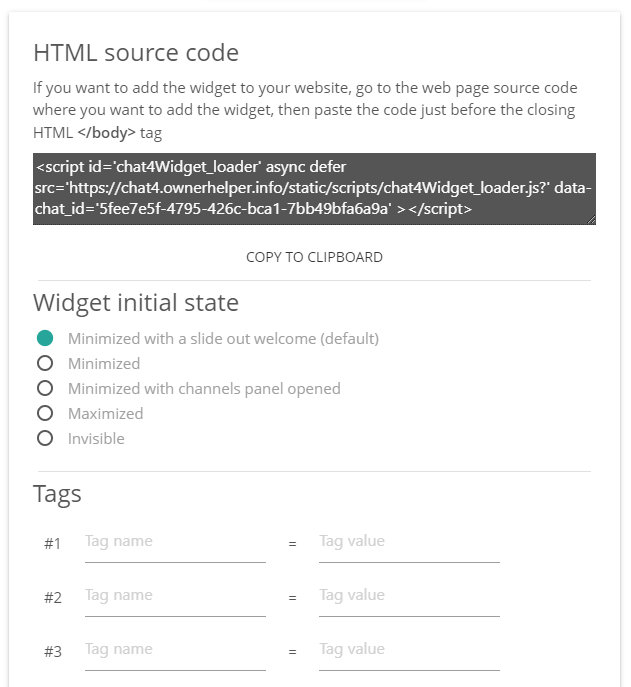
- Copy HTML source code
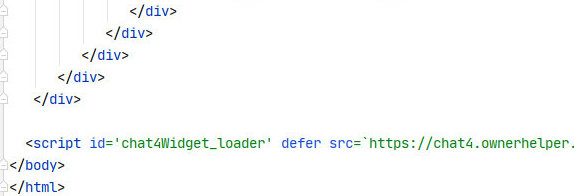
- Paste the code just before </body> tag
- Go to Widget Design
- Set up your Widget
HTML source code
In this section you will find the source HTML code that you need to place in the code of the pages of your website on which the Widget should function.
Before copying the code, you can change the settings, which may differ for different pages of your site.
These changes will immediately be written into the body of the code.![]()
Before copying the code, you can change the settings, which may differ for different pages of your site.
These changes will immediately be written into the body of the code.
- Widget initial state: determines the initial state and visibility of the widget when the page is opened
- Tags: Allows you to add unique tags for different pages of your site. Tags allow to determine from which page of the website the chat widget was opened
- Note: These settings make changes directly to the HTML code.
Any changes to the settings must be done before copying the code.
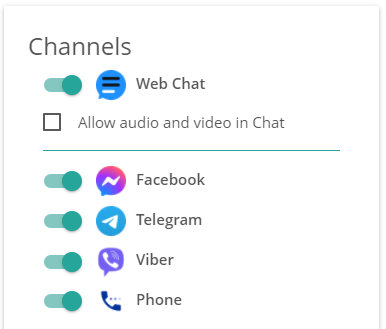
Channels
The channels that the Widget will offer customers to connect to.
Recommendations:![]()
![]()
Recommendations:
- For a Widget used to support website visitors, only use the Web Chat channel
 with the Audio/Video option
 switched off
 - For a Widget used for hotels/villas or for car rental companies on the website or/and in the Online Reception use All Channels
- Switch off the Phone Channelif you don't want the Widget to allow users to call you

Customer Identification
You can set up the Widget to identify customers who have already authenticated on your website.
To set up integration,provide the URL of the your backend service
When an unknown customer tries to connect to the Live Chat, the Widget will try to send POST request to your backend service.
If the request returns the correct response, the Widget will use the response data to automatically authenticate the customer.
Agents in the Team Messenger can then have confidence about who they are talking to.
Because the POST request is executed in the scope of your web page, it will contain all the cookies of your domain, which will allow your backend to identify the customer.
Request response format:
Example of successful response:![]()
To set up integration,provide the URL of the your backend service
When an unknown customer tries to connect to the Live Chat, the Widget will try to send POST request to your backend service.
If the request returns the correct response, the Widget will use the response data to automatically authenticate the customer.
Agents in the Team Messenger can then have confidence about who they are talking to.
Because the POST request is executed in the scope of your web page, it will contain all the cookies of your domain, which will allow your backend to identify the customer.
Request response format:
- If your backend service could not identify the customer:
{ 'ok': false } - if your backend service successfully identified the customer:{
'ok': true
'id': Customer ID in your system,
'name': Customer full name
}
Example of successful response:
{
'ok': true,
'id': '123456',
'name': 'John Smith',
}
'ok': true,
'id': '123456',
'name': 'John Smith',
}
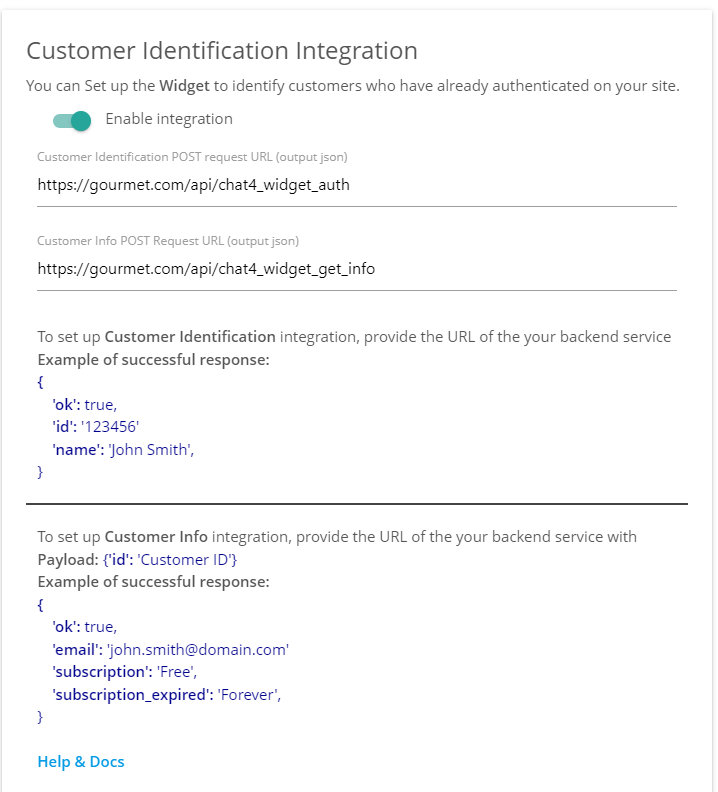
Customer Info
Often the agent that is chatting with the customer needs additional information, such as customers's subscription plan or whether subscription has expired.
If you configured Customer Identification integration, our service will get the uniq customers's ID in your system.
And it will be able to request additional information about the customer from your backend by passing this id.
This information will be available to the agent in the Team Messenger.
When invoking a request, our service will send the payload {'id': 'Customer ID'}, where id is the identifier that your backend returns for the corresponding customer in the Customer Identification request
Example of successful response:
{
'ok': true,
'email': Customer email
'Subscription': 'Free',
'Subscription expired': 'Forever',
}
'ok': true,
'email': Customer email
'Subscription': 'Free',
'Subscription expired': 'Forever',
}
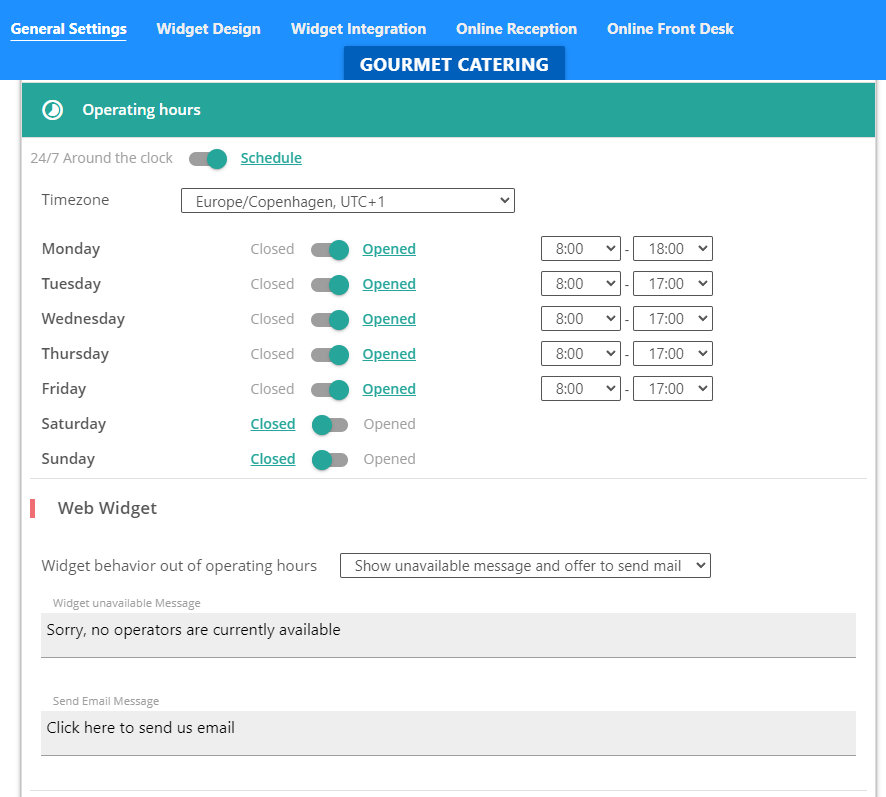
Operating hours
Your team's schedule
Allows you to configure working hours when your team agents can respond to chat messages and non-working hours when the customers receives an appropriate notification and an offer to send an email (depending on settings)
For this feature to work correctly, make sure the timezone is set correctly to match the actual location of your team staff.![]()
Allows you to configure working hours when your team agents can respond to chat messages and non-working hours when the customers receives an appropriate notification and an offer to send an email (depending on settings)
For this feature to work correctly, make sure the timezone is set correctly to match the actual location of your team staff.
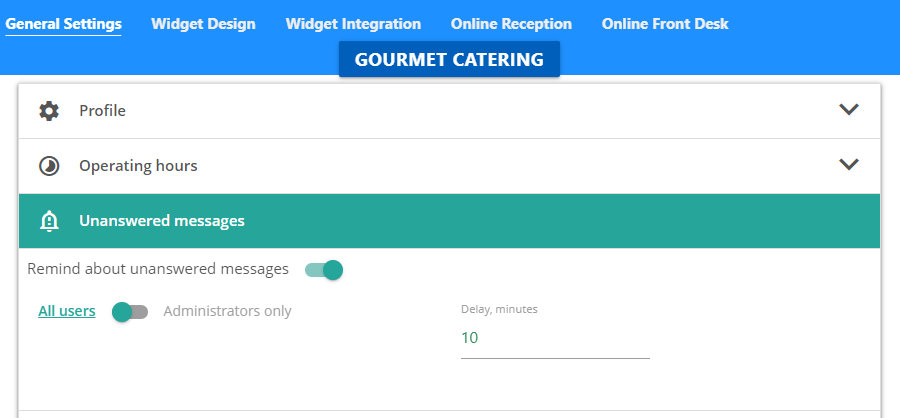
Unanswered messages
If the customer has not been answered within a certain period of time, our service can send a notification of an unanswered message to your team members.
In this section you can configure how this feature should work.![]()
In this section you can configure how this feature should work.
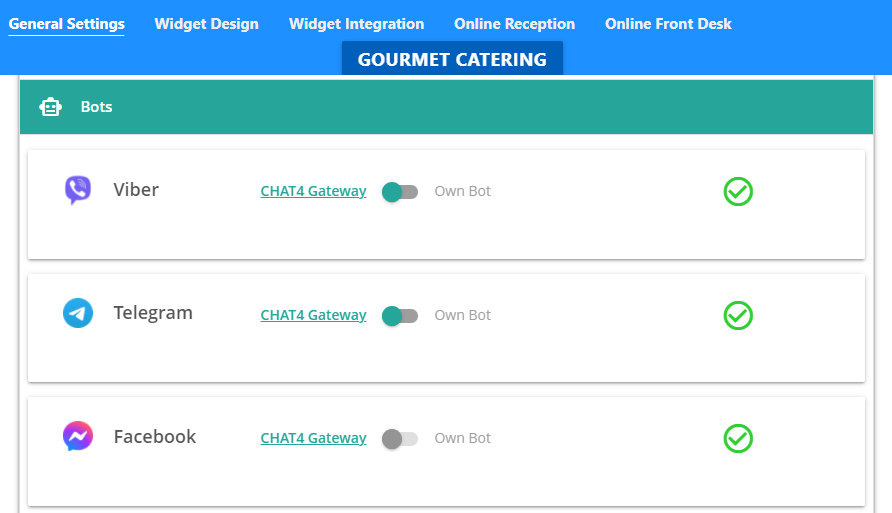
Messenger bots
In order to enable customers to connect to the chat through their messenger applications (Viber, Telegram, Facebook Messenger), we use our gateway bots configured by us in these platforms.
In addition, we provide you with the opportunity to use your own bots for this.
In this case, the customer, when connecting via the messenger app (Viber, Telegram, Facebook Messenger), will see your logo and your project name instead of Smart4.
To use your bot instead of our universal gateway, use the token that you will receive after creating the bot on the corresponding platform
You don't need to configure or code anything other than creating a bot. Our system will use its own code to provide a connection of customers through your bot![]() Below you will find links for creating your bots.
Below you will find links for creating your bots.
In addition, we provide you with the opportunity to use your own bots for this.
In this case, the customer, when connecting via the messenger app (Viber, Telegram, Facebook Messenger), will see your logo and your project name instead of Smart4.
To use your bot instead of our universal gateway, use the token that you will receive after creating the bot on the corresponding platform
You don't need to configure or code anything other than creating a bot. Our system will use its own code to provide a connection of customers through your bot
 Viber: Create a bot here
Note: an active Viber account is needed to receive the login code to access the bot creation page. Telegram: Create a bot here
 Facebook Messenger: Create a bot hereUnfortunately, we are still finalizing this feature for Facebook Messenger.
Using the custom bot itself for Facebook Messenger is currently impossible.
Sorry for the inconvenience.
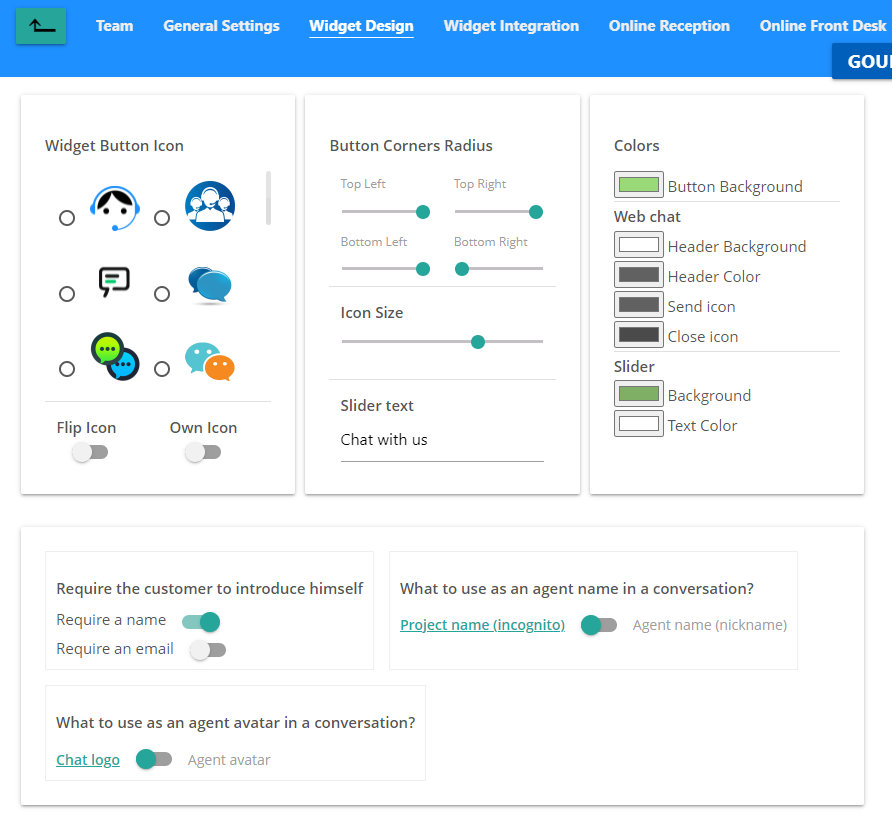
Widget Design
Here you can configure basic widget settings, such as:![]()
- floating icon
- colors
- welcome message
- customer authentication
- etc
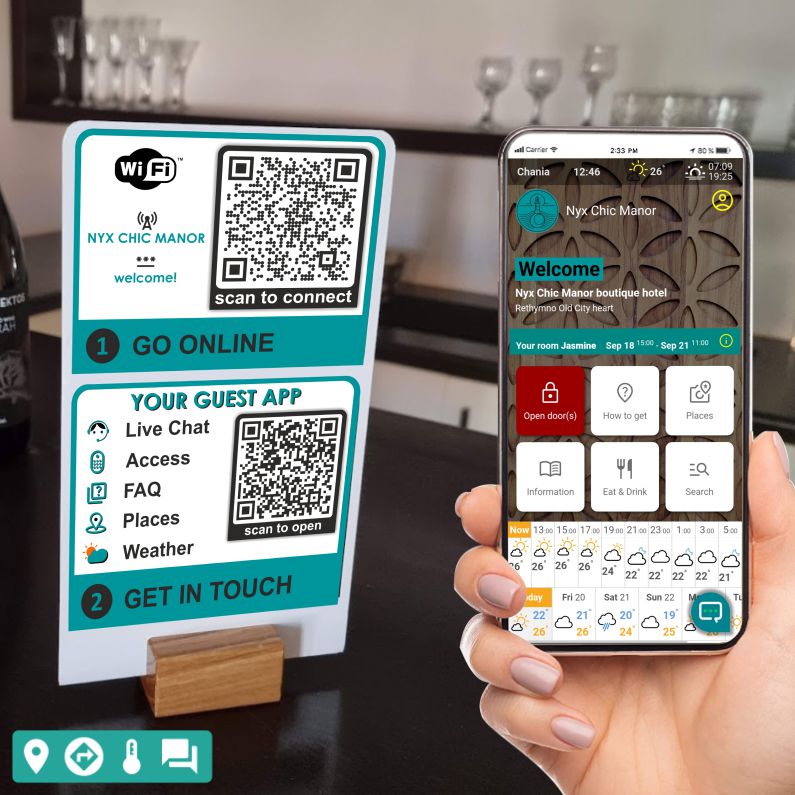
Guest App
At a glance
You can fully configure what it looks like and what information does your Online Reception contain.
On this page you can set up:
On this page you can set up:
Pay attention to the device type buttonsphone_androidtablet_macdesktop_windows
They allow you to see how your Online Reception looks on different types of devices.![]()
On this page you can set up:
- Text of the title, invitation and of the useful information
- Location of your property on the map
- Useful points (places) of interest (POI)
- Text and background colors for each block
- Initial state of the Widget in the Online Reception
- QR plates and sticker with QR-code editor
Pay attention to the device type buttonsphone_androidtablet_macdesktop_windows
They allow you to see how your Online Reception looks on different types of devices.
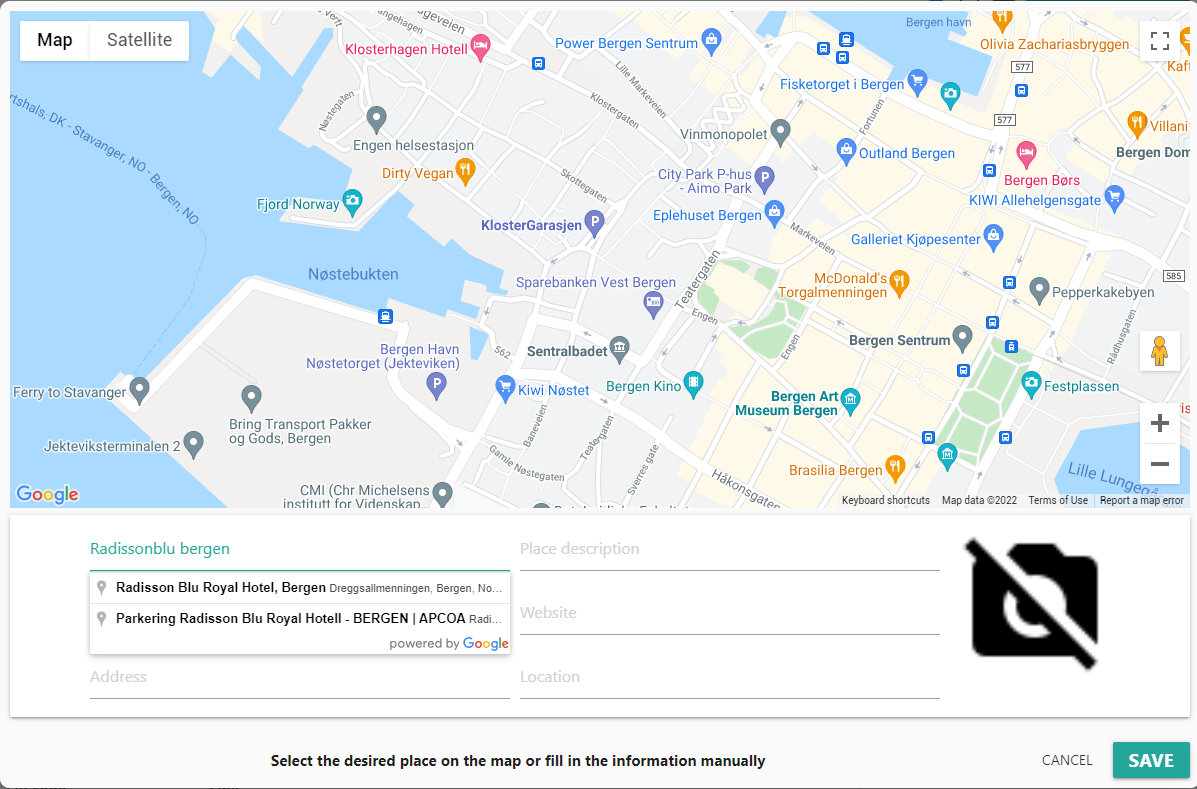
Your property on the map
Specify the exact location of your object (hotel, villas, office, etc.) on the map.
This will allow our service to determine your timezone, weather, etc.![]()
This will allow our service to determine your timezone, weather, etc.
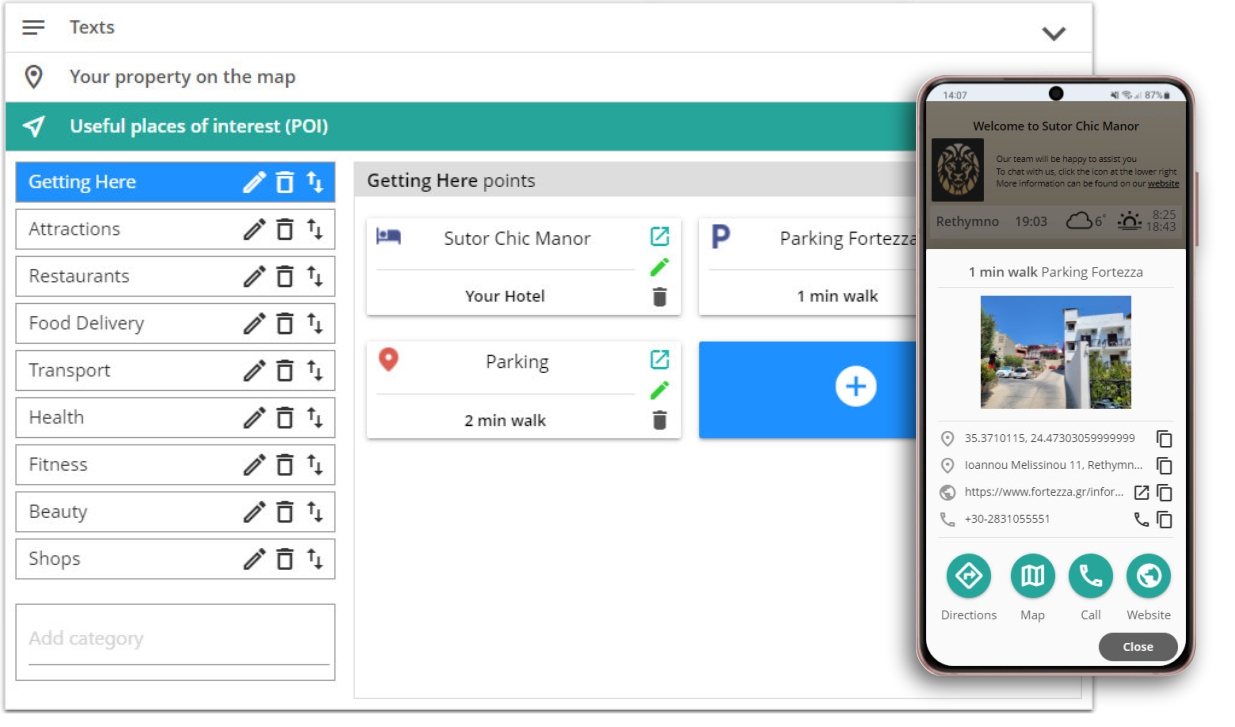
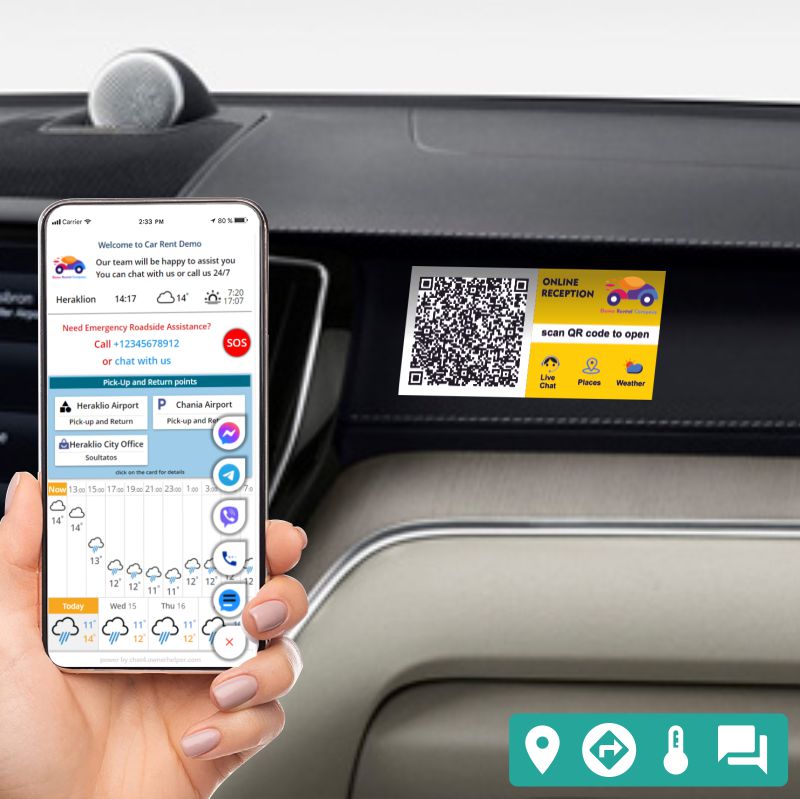
Guest Services Directory
In this section, you can configure information about the Guest Services.
These places will be displayed in the Online Reception and allow your customers
You can distribute places by category and easy to sort them.
For accommodation facilities, this is a great opportunity to provide guests with accurate details about how to drive/walk to the object where the nearest parking is located, etc.Also, guests will be grateful for information on taxi and transfer services, about the best restaurants, spa, fitness centers and shops in the district.
For car rental companies this is a great opportunity to provide customers with accurate details about the pick-up and drop-off points of the car, parking and gas station locations![]()
These places will be displayed in the Online Reception and allow your customers
- Get the address and phone of the place
- Open website of the place
- Get place location on the map
- Use GPS navigation to the selected place
You can distribute places by category and easy to sort them.
For accommodation facilities, this is a great opportunity to provide guests with accurate details about how to drive/walk to the object where the nearest parking is located, etc.Also, guests will be grateful for information on taxi and transfer services, about the best restaurants, spa, fitness centers and shops in the district.
For car rental companies this is a great opportunity to provide customers with accurate details about the pick-up and drop-off points of the car, parking and gas station locations
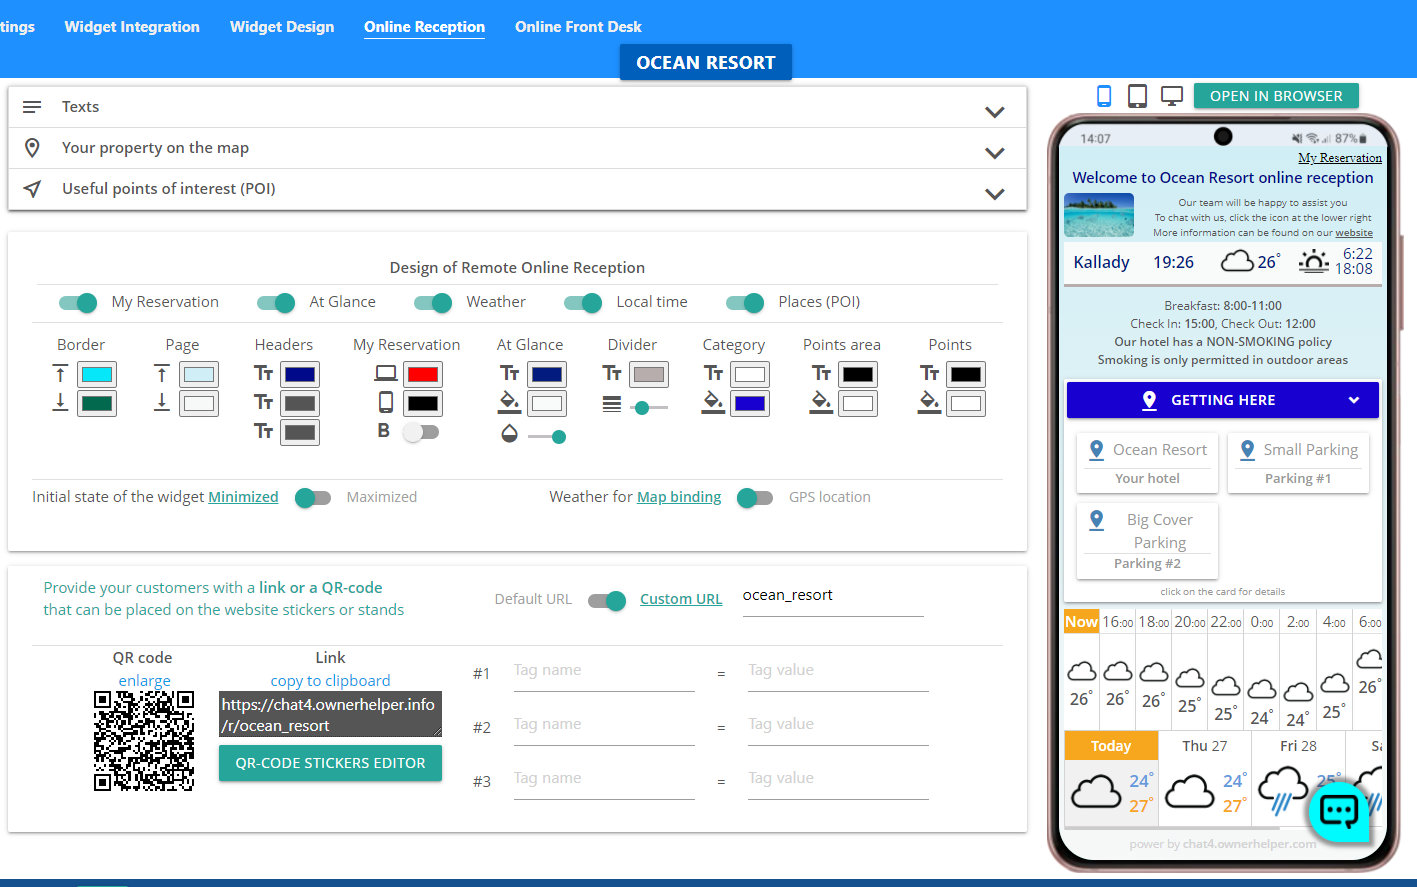
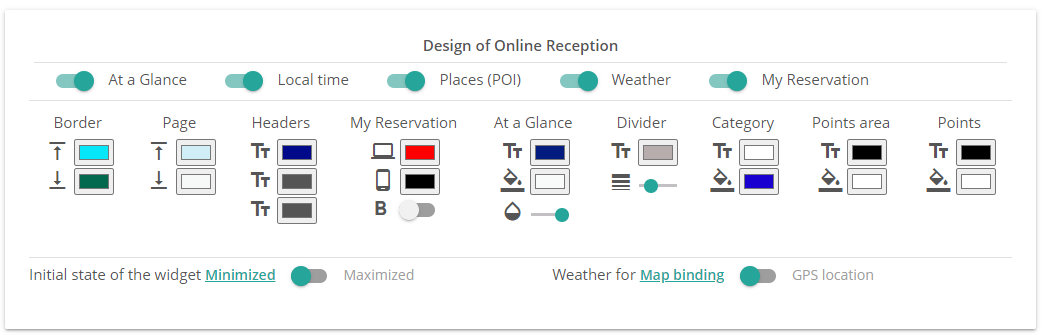
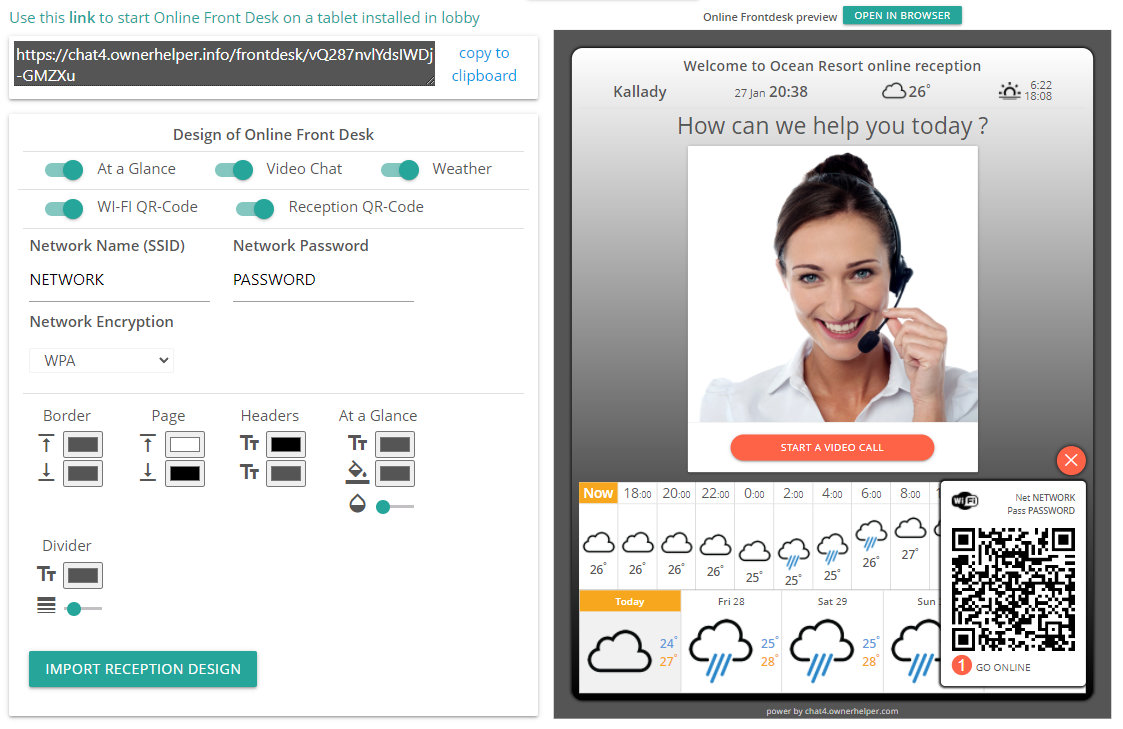
Design of Online Reception
In this section, you can set up the information blocks and colors of the Online reception.
Information blocks:
Customize the color of any element
All changes will be immediately displayed in the "Guest App" visualisation on the right.
Don't forget to save your changes.![]()
Information blocks:
- At a Glance: Information block containing the city name, local time, current weather and sunrise/sunset time
- Local time: Displaying the current time in a At a Glance block
- Guest Services Directory: Information block containing the Guest Services Directory
- Weather: Information block containing the current local weather, hourly and daily forecast
Note:The location for determining the weather can be linked to the location of your property on the map (for hotels, villas) or to the actual GPS location of the device on which the Online Reception is opened (for clients of car rental companies) - My Reservation: Link for the hotel/villa guest, displayed at the top right, where guest can open booking details
Customize the color of any element
All changes will be immediately displayed in the "Guest App" visualisation on the right.
Don't forget to save your changes.
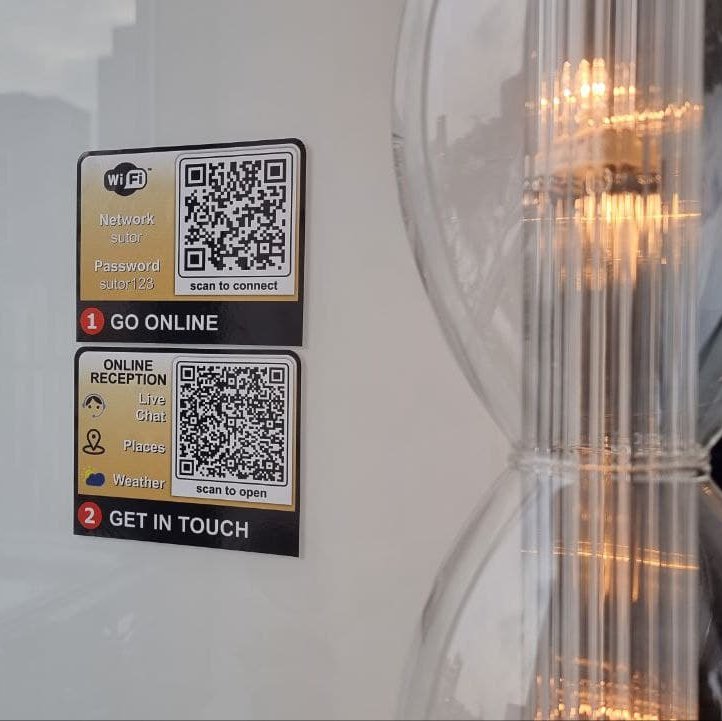
QR-code
This section allows you to set up and get the QR-code that should be placed on stickers, plates, etc.![]()
![]()
![]() Your customers by scanning this QR-code will be able to open your Online Reception.
Your customers by scanning this QR-code will be able to open your Online Reception.
br>Print or order from the agency plates and stickers with the QR-code
You can use the built-in editor to design your QR-code signs and stickers.
You can also download ready-made QR-code and order the production of plates and stickers in a professional agency
Settings![]() Custom Url
Custom Url
QR code
Link
Tags
br>Print or order from the agency plates and stickers with the QR-code
You can use the built-in editor to design your QR-code signs and stickers.
You can also download ready-made QR-code and order the production of plates and stickers in a professional agency
Settings
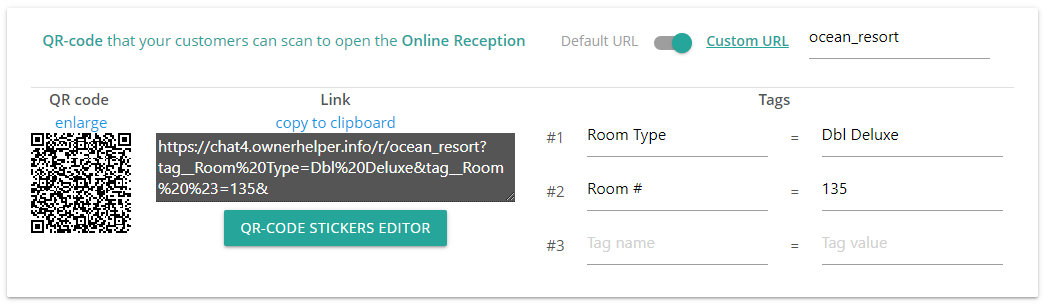
By default the Online Reception link looks like "https://smart4.ownerhelper.com/reception/M-EGeV9o2tH4jgHGa19hU"
With the "Custom URL" you can get the link more simple and readable like "https://smart4.ownerhelper.com/reception/r/ocean_resort"
Note: This setting changes the QR-code
With the "Custom URL" you can get the link more simple and readable like "https://smart4.ownerhelper.com/reception/r/ocean_resort"
Note: This setting changes the QR-code
QR code
Click on the QR-code to save in PNG format for any future use.
Note: Set up Custom url and Tags before saving the QR-code
Note: Set up Custom url and Tags before saving the QR-code
Link
Copy the link of the Online Reception to place in your website or share with your customers in the email, confirmations etc.
Note: Set up Custom url and Tags before saving the link
Note: Set up Custom url and Tags before saving the link
Tags
Tags allow you to add unique tags for different QR-codes.
It allows the agent in the Team Messenger to determine from which room/villa/car/etc the Online Reception was opened
Note: These settings make changes to the QR-code and link.
It allows the agent in the Team Messenger to determine from which room/villa/car/etc the Online Reception was opened
Note: These settings make changes to the QR-code and link.
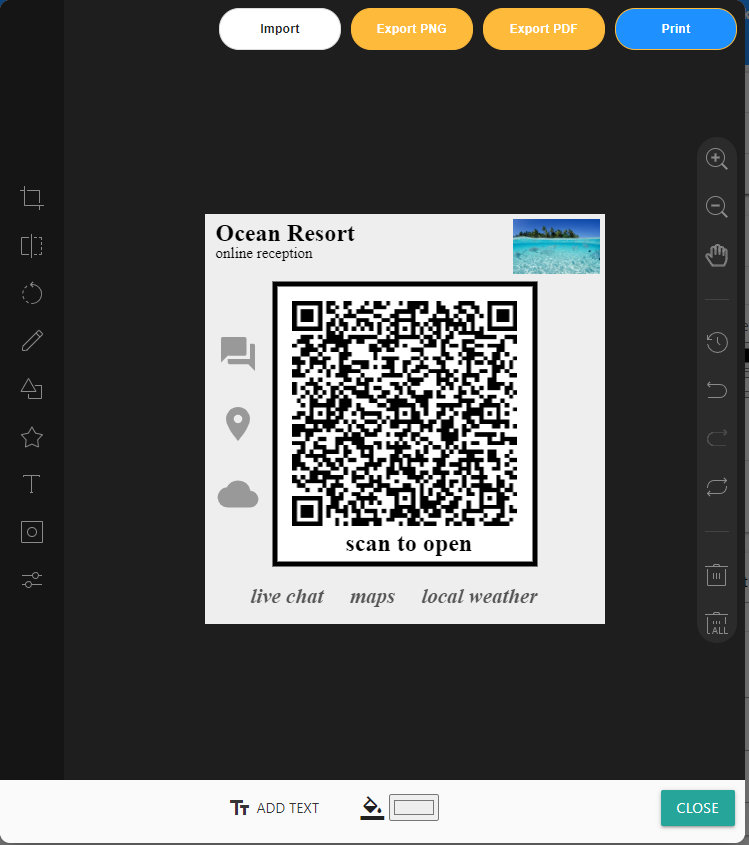
QR-code Sticker Editor
The QR-code Editor allows you to prepare the design of your stickers and plates for self-printing
You can add any text, logo, change colors, etc.
Then you can export to PNG and PDF or print the sticker on your printer![]()
You can add any text, logo, change colors, etc.
Then you can export to PNG and PDF or print the sticker on your printer
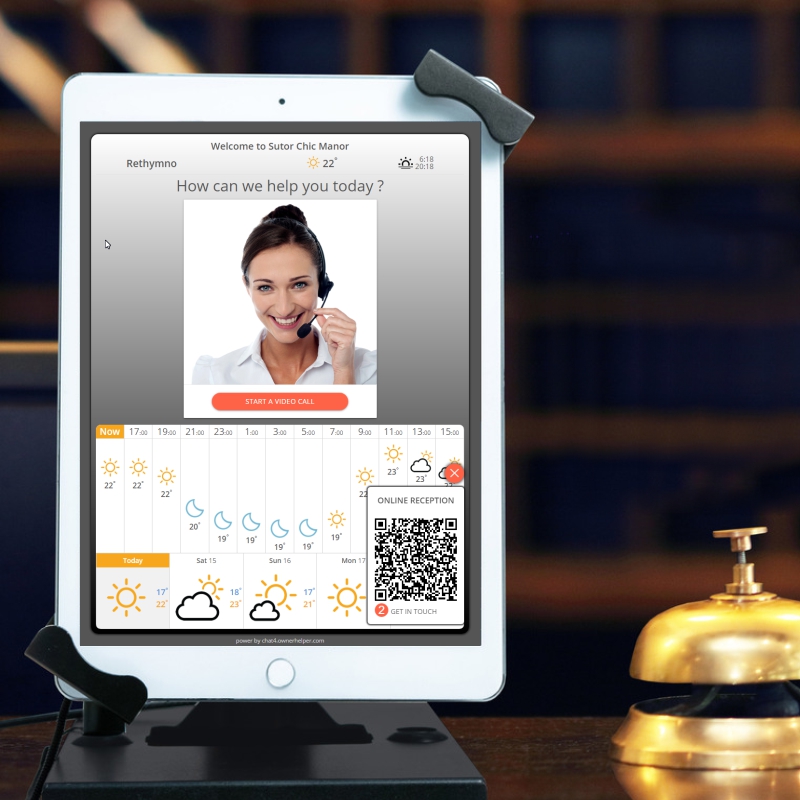
Remote Front Desk
At a glance
Remote Front Desk allows your guests to communicate remotely with audio and video with your staff through a tablet installed in the lobby of your hotel
Additionally, the tablet with Remote Front Desk in the idle mode can display the local weather forecast and QR-codes for connecting guest phones to hotel Wi-Fi and Online Reception
The next version will implement remote scanning of guest's documents for Check-In using the tablet's camera
Remote Front Desk is implemented as a web service that operates in any browser on any device.
The Remote Front Desk will adapt to the screen size of your device.
It works in full screen mode, completely hiding all browser controls.
Install a permanently powered tablet on your counter in the lobby or other convenient place for your guests.
Install on the device
Specify the exact location of your object (hotel, villas, office, etc.) on the map.
This will allow our service to determine your timezone, weather, etc.![]()
This will allow our service to determine your timezone, weather, etc.
Settings
In this section, you can configure information about the Guest Services Directory.
This Directory will be displayed in the Online Reception and allow your customers
You can distribute places by category and easy to sort them.
For accommodation facilities, this is a great opportunity to provide guests with accurate details about how to drive/walk to the object where the nearest parking is located, etc.Also, guests will be grateful for information on taxi and transfer services, about the best restaurants, spa, fitness centers and shops in the district.
For car rental companies this is a great opportunity to provide customers with accurate details about the pick-up and drop-off points of the car, parking and gas station locations![]()
This Directory will be displayed in the Online Reception and allow your customers
- Get the address and phone of the place
- Open website of the place
- Get place location on the map
- Use GPS navigation to the selected place
- and more
You can distribute places by category and easy to sort them.
For accommodation facilities, this is a great opportunity to provide guests with accurate details about how to drive/walk to the object where the nearest parking is located, etc.Also, guests will be grateful for information on taxi and transfer services, about the best restaurants, spa, fitness centers and shops in the district.
For car rental companies this is a great opportunity to provide customers with accurate details about the pick-up and drop-off points of the car, parking and gas station locations
Admin App
PWA (Progressive Web Application)
Our service is implemented in the form of a modern PWA(Progressive Web App), which allows you to simply and conveniently use it without downloading and installing additional applications.
To install and activate our service on a mobile device
To install and activate our service on a mobile device
- Open browser (Chrome is recommended) and go to our site https://smart4.ownerhelper.com
- Sign in with your credentials or Sign Up if you haven't already
- After the first successful sign in, you will be prompted to install PWA (Progressive Web App) on your device
- Confirm the installation of the application, after which the Smart4 icon will appear in the application list, with which you can start our service in the future.
- From now on, you will receive push notifications on your device about new messages.
- Clicking on a notification will open Team Messenger in the corresponding customer's chat.
Smart Devices and Scenarios.
At a glance
This section provides a quick overview of how to manage and automate your smart devices and create customized scenarios.
What are Smart Devices?
Smart devices are internet-connected devices that allow remote control, automation, and monitoring through an app or platform, such as lights, heaters, thermostats, etc
Our system is compatible with a wide range of smart device brands, including: TUYA • SMARTLIFE • EWELINK • SONOFF • Samsung SMARTTHINGS • XIAOMI • GOSUND![]()
Our system is compatible with a wide range of smart device brands, including: TUYA • SMARTLIFE • EWELINK • SONOFF • Samsung SMARTTHINGS • XIAOMI • GOSUND
What are Smart Scenarios
Scenarios enable you to automate multiple devices to work together seamlessly. allows you to create smart and flexible scenarios that will automatically control your devices depending on the configured parameters.
For example, you can configure the daily switching on of the hotel's external lighting 10 minutes before sunset and only if there are guests in at least one of the rooms
Another scenario can turn off the lighting every night at 1:00
Or configure the switching on and off of water heating for a specific room depending on the presence of guests in this room and cloudy weather, when the efficiency of solar boilers drops.
Scenarios will allow you to be sure that all the necessary devices and lighting for your guests are turned on and off on time and at the same time significantly save on electricity and water by avoiding unnecessary consumption![]()
For example, you can configure the daily switching on of the hotel's external lighting 10 minutes before sunset and only if there are guests in at least one of the rooms
Another scenario can turn off the lighting every night at 1:00
Or configure the switching on and off of water heating for a specific room depending on the presence of guests in this room and cloudy weather, when the efficiency of solar boilers drops.
Scenarios will allow you to be sure that all the necessary devices and lighting for your guests are turned on and off on time and at the same time significantly save on electricity and water by avoiding unnecessary consumption

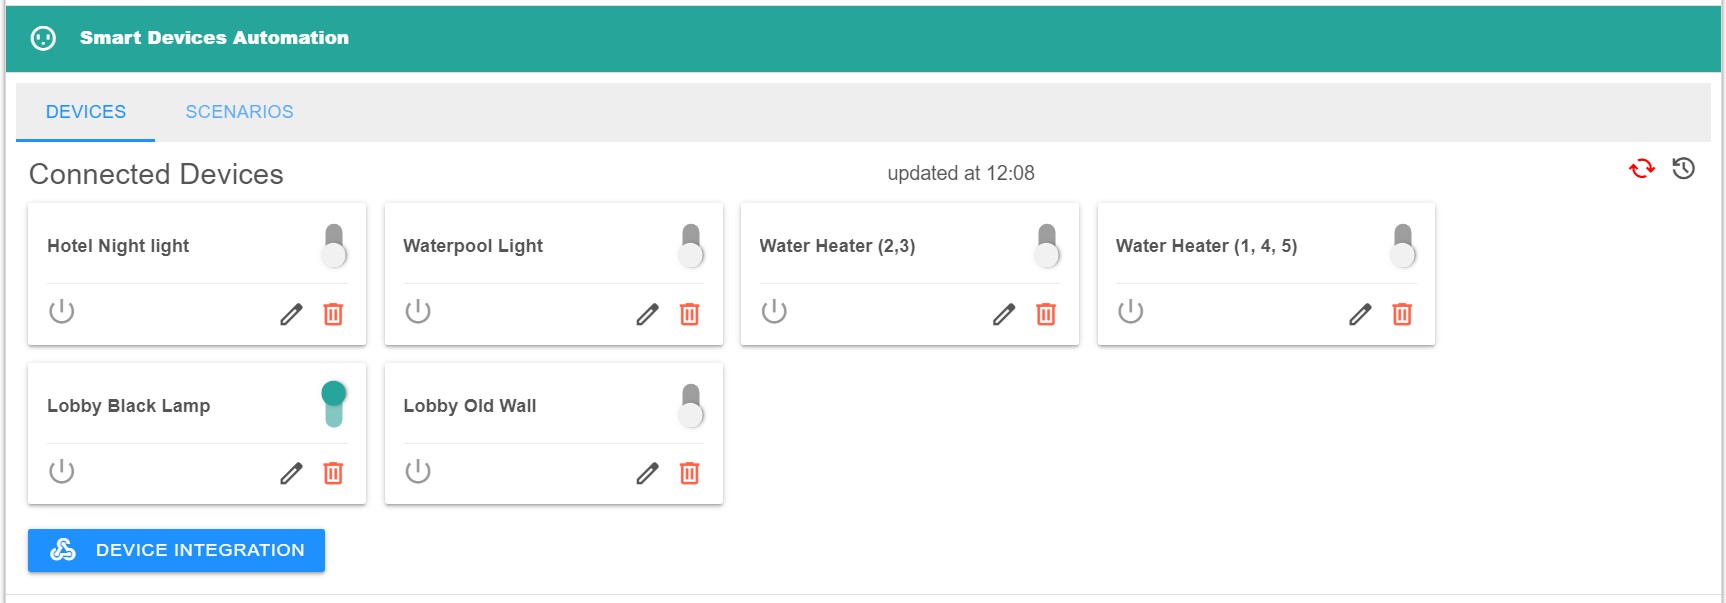
SMART DEVICES settings
In the main menu of the Project, select Automation -> Smart Devices Automation -> Devices
You will see all integrated smart devices of the project and the Device Integration button for adding new ones.
On the card of each device there is an element for manual control, editing and deletion.
You will see all integrated smart devices of the project and the Device Integration button for adding new ones.
On the card of each device there is an element for manual control, editing and deletion.
Integrating a new device
Before integrating devices into our system, you must initialize and add them to your account in the corresponding application (Tuya, Smartife, Ewelink, etc.)
When you click on the Device Integration button, you will see several integration sections for different brands.
If you are integrating devices of this type for the first time, click Grant access and follow the instructions
If you have previously granted the system access to your smart devices of the corresponding brand, then it is enough to click the Import Devices button to integrate new devices.
On the card of each device there is an element for manual control, editing and deletion.
SMART SCENARIO settings
In the main menu of the Project, select Automation -> Smart Devices Automation -> Scenario
Scenario Features and Triggers
Our system supports a variety of triggers and features for scenarios:
- Time - based triggers: Schedule scenarios to activate at specific times.
- Booking status: Automatically control rooms/hotel lights, water heaters and etc based on whether they are booked or vacant.
- Manual activation: Control scenarios directly from the Admin app.
These features ensure your smart devices work in harmony to enhance efficiency andconvenience.
Troubleshooting Smart Devices
Get tips and solutions for common issues like connectivity problems, device malfunctions, and firmware updates.
FAQs
Find answers to frequently asked questions about smart devices and scenarios, including compatibility, security, and advanced configurations.
Smart Locks and Access
PWA (Progressive Web Application)
Our service is implemented in the form of a modern PWA(Progressive Web App), which allows you to simply and conveniently use it without downloading and installing additional applications.
To install and activate our service on a mobile device
To install and activate our service on a mobile device
- Open browser (Chrome is recommended) and go to our site https://smart4.ownerhelper.com
- Sign in with your credentials or Sign Up if you haven't already
- After the first successful sign in, you will be prompted to install PWA (Progressive Web App) on your device
- Confirm the installation of the application, after which the Smart4 icon will appear in the application list, with which you can start our service in the future.
- From now on, you will receive push notifications on your device about new messages.
- Clicking on a notification will open Team Messenger in the corresponding customer's chat.
Smart4 API
API
Smart4 allows you to control the behavior of the widget using the available API functions
By default, the Chat Widget is displayed collapsed with slided welcome message. This can be changed in the widget's HTML code settings using the data-state parameter.
Using the API, you can open or close the chat window, open the channels panel, make the widget invisible
On each page of your site with an embedded Chat Widget, you have access to a global instance of chat4Widget with which you can use the API, for example chat4Widget.openChat();
Open Chat
chat4Widget.openChat(); - calling this method will open (maximize) a web chat window
Click here to see how it works
Click here to see how it works
Close Chat
chat4Widget.closeChat(); - calling this method will close (minimize) a web chat window
Click here to see how it works
Click here to see how it works
Hide Widget
chat4Widget.hideWidget(); - calling this method will hide Chat Widget
Click here to see how it works
Click here to see how it works
Show Widget
chat4Widget.showWidget(); - calling this method will show Chat Widget
Click here to see how it works
Click here to see how it works
Open Channels Panel
chat4Widget.openChannelsPanel(); - calling this method will open Widget Channels Panel
Click here to see how it works
Click here to see how it works
Try SMART4 today
Service that is always with you
No credit card required • Free plan available • No website required